Just a few quick snaps to show some in-progress of the XJ6 front suspension rebuild…after 41 years, it was probably time. I’m taking the opportunity to reseal the rack, replace everything rubber, and generally make things ship-shape.

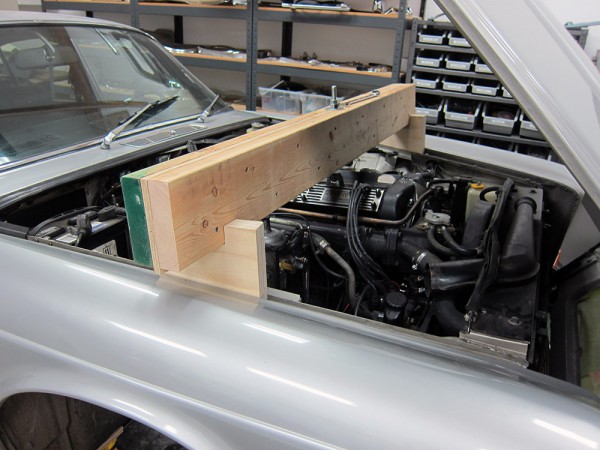
I made the beam above to hold the engine (which is normally supported by the engine mounts on the cross-member); it engages the lifting hook via an eye-bolt.
It’s really funny–I spent way too much time trying to calculate the sag on a 4′ beam with several hundred pounds hanging from the center. My laminated beam (glued and screwed!), consisting of 2 x 8 dimension lumber with a half-inch plywood center, would probably hold the entire car. Typical Roger Over-Engineering. The plywood is cut to fit on either side of the notch in the beam. As I recall, the angle on the bottom is 7 degrees, and the bonnet opening is 10 degrees, so it’s a lot of head scratching at the chop saw.
The supports are two pieces of 3/4 plywood glued together, they fit snugly in the channels. I notched them over a couple of the fender bolts to provide some “lock”, but realistically, with all that weight hanging on it, it’s not going anywhere.
The suspension is carried on this sub-frame, and it wasn’t too bad to get out. The book neglected to mention several small details which I was too “by the book” to notice, so there were some exciting moments as it was lowered. The center of gravity when everything is attached is the very back edge…which is also not noted anywhere.
The biggest struggle was “drifting out” the lower a-arm shafts. The one pictured below had the added benefit of a seized bushing. I cut the rubber off and then hand filed it until the metal was paper-thin. A few blows from a hammer cracked the steel, and once the “gripping” force was relieved it slipped right off.
I hand-filed as I didn’t want to nick or damage the shaft itself.
I told myself I wasn’t going to blast or paint any of this stuff on my “driver” but not sure how well I will adhere to that. That said, it’s a super-tough environment and any “shiny” will disappear within a couple of weeks.


what a bloody lot of work… nothing like the windscreen washer I put in the Spitfire, of course, now that’s REAL work & VERY vital as well! but still, well done! cheers, J.
do you have a parts breakdown of the Upper & Lower control arms and associated fasteners?
I googled a parts list off the ‘net, but I think there are some discrepancies compared to what mine is.
thanks