The inner fenders have been installed–which somehow don’t make the car look any more like a car, as such. (I have the cowl temporarily installed for the following reason: Just because.)
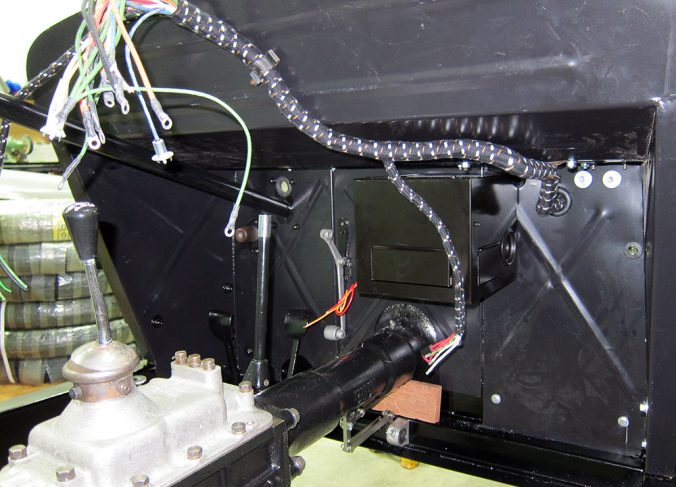
I’ve also started wiring, for the same reason as the cowl-fitment. There have been a few minor glitches, as such, but the loom is a nice piece and seems to go to all of the right places.If I have a quibble, it’s that beneath the lovely fabric coverings, all of the PVC insulation is either black or white. The best looms have PVC coatings which match the fabric colors, so when the fabric fades, you can still tell what color the lead is by peeling back the fabric a bit. I will probably not live long enough to worry about it!
The main “glitch”, as such, is that the loom necessitated moving the position of the electrical components a bit, mainly because the leads to the DB-10 control box are very short and the bit of loom which they sprout from must be exactly where shown. It’s also mildly annoying that the branch headed to the driver’s side is in front of the cluster of leads going to the control box. Speaking of the control box, I have a new one on order, as mine has been changed to a slide-connector style at some point, and it should have screw-down terminals. This one is dated 1973, I think.
The fuse box is the original, while the DB-10 is a 1959 unit. I cleaned up the DB-10 (the big silver box), but have not had it re-plated or painted it. I’m fairly agnostic about re-finishing electrical components if they’re not absolutely horrible, and this one isn’t.
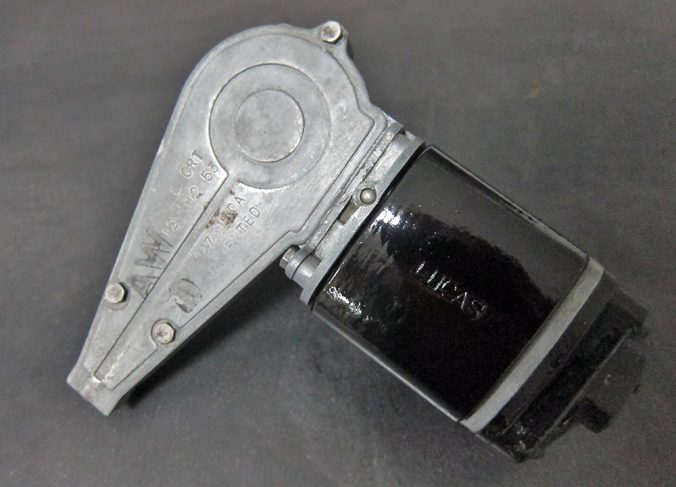
The wiper motor is the original, with a 1953 date on it. It took an evening to extract the remains of the 1953 grease from the gearbox! I suppose I should put some power to it and see if it works, I doubt it has been turned on in 30 years or more.
The horn is not original; it is a 1964 Savor, a French (!) brand. If you have a French classic which is dying for one of these, drop me a line. I’ll be buying the appropriate reproduction wind-tone Lucas.
The car also now has a heater. This is an “Allstate” heater, as fitted to cars imported by Fergus Motors to the states. The original firewall had matching holes for this style, and I’ve mounted this one in the same place. Note how high the dip switch for the headlights is, on the left beyond the top of the handbrake handle. There is no room in the pedal box at foot-level for it, I’m sure it’s very amusing to use. (When faced with the same problem in the E-Type, Jaguar went with a dashboard flick switch!)
I’m hand-painting the chassis fasteners black as I go, but haven’t got around to the passenger foot well yet, as you can see. I’ve also been using modern fine-threaded SAE fasteners on the chassis, as the original hardware was in tough condition and frankly pretty cheesy. I’m hand-painting them as I’ve found that to last as well as most coatings and far, far better than black oxide, which is a temporary cosmetic coating at best.
I have the two oiler lines to the kingpins in place; these caused some grumbling here at Rusty Heaps Worldwide HQ as the lines came coiled, and straightening coiled stainless lines is for the birds. I am just about done bending lines, I have to do the oil line to the gauge and the small line to the brake master, which may even re-appear here one of these days with a new sleeve installed.
Not sure of the status of the engine, I was hoping for the bits to be back this week, but no luck yet.
I’ve painted the “outside” of the inner fenders with SEM “low-voc” undercoating. It’s rubberized, but has a fairly fine texture and makes for a neat under-side appearance. Hopefully it will stand up to the harsh realities of the wheel wells better than plain paint would.
I placed sheet rubber (cut from the old Dunlop inner tubes from the original tires, no less) between the inner fenders and chassis, to reduce creaks and squeaks. I will used black silicon sealant on the wheel well side of that seam in an attempt to keep water out. I will also use silicon to seal the openings at the top of the inner fender and along the firewall and chassis for the same reason. I’ll leave the bottom of those spaces unsealed, so any water that might find its way in can find its way out. I will also be putting some waxoyl or equivalent into the firewall/chassis contact points before sealing, though all of this is overkill on a car unlikely to see significant amounts of water for the rest of its life…
Horror of horrors, I’m using new, rubber-lined clamps for the harness. The original clamps that remained were all in very tough shape, and these at least have the advantage of being readily available and hopefully will be a bit kinder to the wires and lines they hold.
You can see some of the Morgan “fudge factor” in the alignment of the connecting piece at front. As you bolt the external panels into place, there is lots of pushing, shoving and thumping to get everything mostly aligned, and this will find a mostly-centered, mostly-straight home.
I dropped the wheels off today at Factory Direct Tire in Edmonds, who will straighten and powder-coat them in an appropriate low-sparkle metallic silver. (Is there any other kind of silver? Hm.) I rarely have things powder-coated, but this seemed appropriate. When they are done, I’ll have Factory mount the tubes and tires, and the car can sit on the ground again. Progress!


